Sunday, November 30, 2008

Funky Forest Tutorial


Hi! I'm back!!! I hope everyone had a great week and a happy Thanksgiving for all of you in the US. Thanks to everyone that stopped by and for all the wonderful comments and emails. I am still catching up and will be around to your blogs soon.

I had about 200 emails and over 400 posts in my reader, so you can imagine how behind I am. It was so worth it, though. I had a fabulous time at Disneyland with a bunch of my husband's relatives. Our hotel didn't have complimentary wireless and I wasn't willing to pay $10 a day for it, since I new I wouldn't have much time online anyway. Isn't that archaic? Every hotel should provide wireless in this day and age, don't you think?

This was our first time to DL since California Adventures opened. I loved the big roller coaster there. Wow, intense, but fun! DL was decorated so beautifully for Christmas. Do you have a favorite Disney ride? Some of mine are Big Thunder Railroad, Indiana Jones and Haunted Mansion.

So, wanna know the worst part of my trip? Knowing my latest order from Gina K was sitting in my mailbox. It drove me crazy all week, thinking about all my new stamps sitting there without ink. LOL. I ordered some of the new 80 lb Pure Luxury White Card Stock. After hearing how smooth it is, I wanted to try it out for sponging and it is awesome!

I have been using Stampin' Up Whisper White, which is wonderful because of it's brilliant white color and smooth texture, but this new paper from Gina K is even smoother, which is perfect for sponging.

Sorry for being so chatty. I'll get on with how I made the card now...

Stamped the snowman from Funky Christmas.

Masked the snowman and stamped the trees from Tree Silhouettes, using black Stazon ink. Then embossed with clear while the image was still wet.

I added some blue to the snowman with my Koh-i-noor pencils and OMS. I also colored the hat with Koh-i-noors.

Used Marvy markers for the nose, hat band and buttons. I also used a blue pen to add some deeper shading to the snowman around the edges.

Filled in the snowman with a Versa Mark pen and then embossed with clear.

Masked the bottom with torn post-it's and sponged the sky with Bashful Blue and Ballet Blue.

Used torn post-it's and grey ink to sponge some shadows in the snow.

Sponged Ballet Blue, Not Quite Navy and Black around the edges.

I used my White Sakura Gel Pen to add some snow flakes and snow on the branches.

I finished with a layer of Basic Black, follow by Baja Breeze, another Basic Black and card base of Pacific Point.

Have yourself a wonderful day and thanks for stopping by!

Friday, November 28, 2008

All Washed Up

Here is the last of my scheduled posts. I had all the pieces of this card ready to go months ago, but never got around to assembling it. I just couldn't decide if it needed ribbon or not. In the end I decided to skip the ribbon and add some piercing.

The stamp is from Penny Black and I colored it with water color pencils and heat embossed it with clear embossing powder. The purple layer is Lavender Lace. Pretty simple, eh?

With luck, I will be back to my normal erratic posting tomorrow, Monday at the latest.

Enjoy the rest of your weekend!

Thursday, November 27, 2008

Morning Glow Lilies

More flowers! Can you tell I love nature stamps? This image is one that I made while I was guest designing for Melanie. I rejected it at the time, because the flower color wound up so close to the background color, making the whole image look a bit washed out. I am getting desperate for projects to show while I am on vacation, so I dug this one out. Just wait til you see tomorrow's. I had to dig deep for that one.

The flowers on this card are from A Year of Flowers, and colored with Koh-i-noor pencils. Then I embossed the image and went back and sponged the background. I used So Saffron, Summer Sun, More Mustard and Pumpkin Pie inks.

The image is mounted on a layer of Basic Black, which is adhered to a Kiwi Kiss card base.

Have a happy Friday!

Wednesday, November 26, 2008

Lavender Lace Orchid

Happy Thanksgiving! I hope everyone is having a wonderful day, filled with food, family, friends and fun (and lots of pie!).

This is the third and last of the images I colored using my mom's Copic markers. I can't wait to get my own. The orchid is from a stamp set called Botanical Dreams by Asela Hopkins.

After coloring the image with Copics, I cut it out and adhered it to a piece of white card stock that I embossed 1/4 inch from each edge. That was backed with Basic Black and below that is a layer of white, sponged with Lavender Lace ink. The card base is Almost Amethyst.

Thanks for stopping by. I hope you are having a wonderful day!

Tuesday, November 25, 2008

Sentimental Owl

I made this card using Owl Always Love You (my first Gina K set) and Autumn Leaves. The owl is colored using Koh-i-noor pencils and cut using my oval nestabilities.

The oval background is sponged using So Saffron, Certainly Celery and Old Olive. The rectangular panel is sponged with Certainly Celery and run through the Perfectly Paisley CB folder.

Those little black embellies are from Michaels. The are in the wiggly eyes section. They are the perfect substitute for black brads when you want to add them to a single layer.

I hope you have a great day!

Monday, November 24, 2008

Offset Nestie Frame

A CAS card! Not my usual style, but I was in the mood for a crisp, clean look (or pressed for time, lol). In this card, I wanted to mimic the swirl pattern you find in candy canes, to complement this Unity stamp. To do that, I made a frame from an oval nestabilities set..


I started by cutting a scalloped oval using my nestabilities. Then I lined up a larger oval evenly on the remaining piece of card stock and ran it though my Cuttlebug.


I was left with a narrow frame, which I mounted on a card base.

Next I adhered a white smaller, white oval to the original scalloped oval that I cut. Then I adhered it to the opening of my frame, rotating it slightly, to leave negative space showing on each scallop.

I finished it by adding this cute candy cane from Unity. It was colored with Marvy markers and Koh-i-noor pencils.

Sunday, November 23, 2008

Flowers For You

Hello. I hope you had a happy weekend. My daughter, her friend and I went to see the Twilight movie today. It was a very nice movie. Edward is so dreamy!

I want to let you know that I am taking the week off from blogging (and stamping, gasp!) to spend with family. I have a few posts scheduled, but I won't be making the rounds to comment on those blogs I usually visit. I'll try to check my email a few times, but no promises. It is shaping up to be a very busy week.

This card is for the featured stamper challenge oat SCS this week. The featured stamper was Ebethneu. Her gallery is amazing. This is the card I chose for inspiration.

I just can't seem to stay away from Melanie's mums. I pulled out A Year of Flowers and stamped the mums on white card stock. I used Marvy markers and Koh-i-noor pencils to color the image, and then cut them out.

I sponged in the background using Certainly Celery, So Saffron, Apricot Appeal and Regal Rose. My card stock was Certainly Celery, Apricot Appeal, Whisper White and pink.

That ribbon treatment was inspired by Faith (aka Markie's Mom). She does the most fabulous ribbon treatments. Everything she does is fabulous.

Now I have a confession to make. I am a total space cadet. I thought I had a Pretty in Pink ink pad, but I happend to glance at the name today and realized it is Regal Rose. Every time I have used that ink, I have listed it as Pretty in Pink. How sad is that? My only excuse is that I am over 4o and the brain just isn't as sharp as it once was. Oops! I'll try to get it right in the future. Now I better go look at the rest of my ink pads and make sure I know what colors they are!

Have a great day!

Friday, November 21, 2008

Chocolate Cupcakes


The limited supplies challenge at SCS today was a fun one. All you had to do was incorporate chocolate in your project in some way. I used some Chocolate Chip ink and made "chocolate" cupcakes on my card.

I stamped my cupcakes with Black Stazon ink and then colored them with Koh-i-noor pencils, blended with odorless mineral spirits. All of the images are from Cupcakes A'La Yummy from Unity Stamp Co.

Each of the cupcakes rests on a 1 - 3/8 inch circle of Very Vanilla, sponged with Pretty in Pink. That circle, in turn rests on a 1 - 1/2 inch black circle then then a scalloped circle, punched from Close to Cocoa and sponged with Chocolate Chip ink.

The triangle panels are all Very Vanilla, sponged with Pretty in Pink ink, backed by Basic Black and mounted on a Pink Pirhouette card base.

Thanks for the visit! I hope you have a great weekend and for those of you heading off on a Thanksgiving vacation, I wish you the best of times.

Thursday, November 20, 2008

Get Well Daisy

Hello and happy Thursday! I played along with the SCS challenge today to use pearls. This is the second of three images I colored using my mom's Copic markers. The image is from A Year of Flowers by Melanie Muenchinger. The sentiment is from Say it With Flowers, also by Melanie.

The oval is sponged with Bravo Burgundy and So Saffron and the square layer below that is sponged with So Saffron, Creamy Caramel and Chocolate Chip.

The embossed layer is Very Vanilla, sponged with Bravo Burgundy and embossed with the Birds and Swirls CB folder. Each of the layers is backed with Basic Black and the card base is Apricot Appeal.

Here is another way to used the oval punch with the Flourish punch by EK Success.


Start with two flourishes and lay them out with one flipped over and upside-down.


Slide the oval into one of the flourishes.

This is the tricky part. Slide one side of the next flourish over the oval and under the other flourish and let the other side go under the oval.

Then pop the little end over the first flourish. I hope that made sense, but a picture is worth a thousand words, right?

Have a great day!

Wednesday, November 19, 2008

Whimsical Butterfly

I really liked the sketch challenge at SCS today. This is what I came up with using it. The butterfly is from Butterfly Beauty from Unity.

I used a few stamps from Growing in Unity to create a frame around the butterfly.

To make the background, I sponged So Saffron, More Mustard and Pretty in Pink on a single piece of white card stock. Then I cut the pieces to fit the sketch. After that, I stamped the flourishes on the side pieces.

The butterfly is colored with Marvy markers and then embossed.

I hope you have a great day! Thanks for stopping by!

Tuesday, November 18, 2008

Christmas Blessings

Look Ma, no sponging... Or at least not much. I was in the mood for a cleaner look today. I pulled out an image I colored over the weekend, from a Gina K set called Christmas Blessings, illustrated by Asela Hopkins.

My mom came over on Saturday and she brought her Copic markers for my to try out. This was my first time using Copics, and, wow, they were so much fun to use. I have a few other images I colored that I will share soon.

The card stock colors on this card are for the color challenge at SCS today, to use Real Red, Basic Black and Kraft.


After I colored the image, I went back with a white Sakura gel pen and added some "snow" to the roof line and trees. For the sky, I used some water colors and sponging. I was afraid to try to do sky using Copics, until I practice more.

Did you notice the sentiment treatment? I was playing around with my SU large oval punch and my new flourish punch from EK Success.

The oval fits right inside the flourish.

Here is one where I used two punched flourishes in two colors. Sorry for the blurry picture.

Thanks for visiting. I hope your day is fill with happiness!

Monday, November 17, 2008

Triangle Fold Flower

Hello! I hope everyone had a wonderful weekend. The weather here was great and I really enjoyed getting out and soaking up a little sun.

The Try a New Technique challenge at SCS today was to make a triangle fold medallion. I have never done one of these before, so it was a good challenge for me. Here is the link to the challenge with with instructions on how to do it.

I used designer paper from K&Company for my medallion. Before assembling the pieces, I sponged the triangles with Ruby Red ink to give it a bit more dimension.


Once I had it together, I thought is looked a bit like a poinsettia, so I pulled out Melanie's A Year of Flowers and stamped some leaves to go around it. I stamped them on white card stock and then sponged them with Old Olive ink. Then I used my aqua painter to add some shadows.

The background is Very Vanilla, sponged with Ruby Red and then dry embossed with the Swiss Dots Cuttlebug folder. After embossing, I sponged on a little more Ruby Red on the dots. Below that is a layer of Bravo Burgundy card stock, then Basic Black. The card base is Creamy Caramel.

Have a great day!

Sunday, November 16, 2008

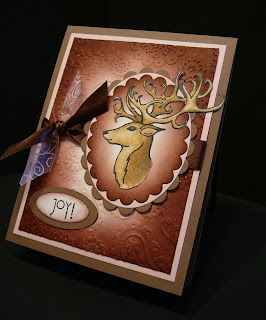
Joyful Deer

Handmade Christmas card featuring Unity stampsI made this card for the Featured Stamper challenge at SCS today. This is the card I cased, by Kendra.

We were to change at least 4 things on our card. My changes were...

Used different stamps
Changed colors
Embossed background
Raised the sentiment onto an oval


I colored the deer (Unity) with Koh-i-noor pencils and blended it with odorless mineral spirits. I sponged the background with Bravo Burgundy ink. For the larger background panel, I embossed using the Perfectly Paisley embossing folder. The pink layers are Pink Pirrouette and the brown is Close to Cocoa.

Have a great day!

Friday, November 14, 2008

Thanksgiving Whimsy

Melanie issued a challenge in the Gina K forums to make a card using at least three Gina K stamp sets. I love combining stamps sets, so this was a fun challenge for me.

The pumpkin from Cammie's latest set, Whimsical Autumn, was stamped on white card stock and colored with Koh-i-noor pencils and Marvy markers. Then I embossed the image and sponged the background with So Saffron, Creamy Caramel and Pumpkin Pie inks.

I also stamped the leaves from Autumn Leaves and the fern from Botanical Dreams and colored those with Koh-i-noor pencils.

The larger panel was sponged with So Saffron, Creamy Caramel and Pumpkin Pie, then stamped with another stamp from Botanical Dreams, using Creamy Caramel ink. The sentiment is from So Grateful and the card base is Really Rust.

Thanks for visiting. I hope you have a fun weekend!

Thursday, November 13, 2008

Autumn Mums

Hello. I hope everyone is having a good day. Here is another Year of Flowers card. I got a little crazy today and used designer paper and masking all in one card. Ordinarily I don't do much masking, but I really wanted to make a stem with several flowers and leafs. Oh, and have I mentioned that I have a fear of DP? I am trying to overcome it.

After I stamped all the images on watercolor paper, I colored them with Marvy Markers, water color pencils and an aqua painter. Then I cut out the image and adhered it to a sponged oval.

The ink colors I used for sponging are Creamy Caramel, So Saffron, and Chocolate Chip. I used Kiwi Kiss, Basic Black, and Creamy Caramel card stock, in addition to K & Company card stock.

Gina K is having a release party tonight in the SCS forums. I'll be hanging out and stalking the poor DT until the new releases are available to purchase. I am dying to get my hands on those cookie and coffee sets. Let me know if you are there, so I can say "hi."

Have a great rest of the day!

Wednesday, November 12, 2008

Life's a Picnic

I made this card using the sketch from today's challenge at SCS. Most of the images are from Life is a Picnic from Treehouse Stamps.

I started by stamping the ant on Whisper White card stock. Then I colored him with Koh-i-noor pencils, blended with odorless mineral spirits. I went over the entire image with a Versa Mark pen and then heat embossed with clear embossing powder.

Next, I sponged the background with Certainly Celery and Bashfull Blue. Then I went around the edges with more Certainly Celery and some Old Olive.

I added some greenery, by stamping the Dream Tree and a stamp from Gratitude = Joy, around the edges.

The strawberries were colored with Marvy Markers, cut out and heat embossed with clear.

Thanks for stopping by. I hope you have a terrific day!